
Replacing Zendesk Event Bridge
Upgrading the SAR application? Please read important note before doing so.
Introduction
This add-on replaces Zendesk integration with Amazon Event Bridge which is being discontinued as of December 2025.
Once installed and configured, this solution uses a Zendesk webhook linked to an AWS API Gateway endpoint and processes a Zendesk Support ticket event through a Lambda function, creating an Amazon Connect task. Configuration based mapping allows this solution to replicate Connect rules based behaviour of the phased out integration.
Prerequisites
This feature works with Amazon Connect app for Zendesk versions 2.4 and later.
Installation guide
To enable this feature, a serverless application needs to be installed within the AWS Serverless Application Repository.
Sign in to the AWS account, then search for and select the Serverless Application Repository service.
Make sure you are in the same region as your Connect instance.
Click on Available applications.
Under Public applications, select the checkbox Show apps that create custom IAM roles or resource policies.
In the search bar enter Zendesk and press Tab, to search for Zendesk related applications.
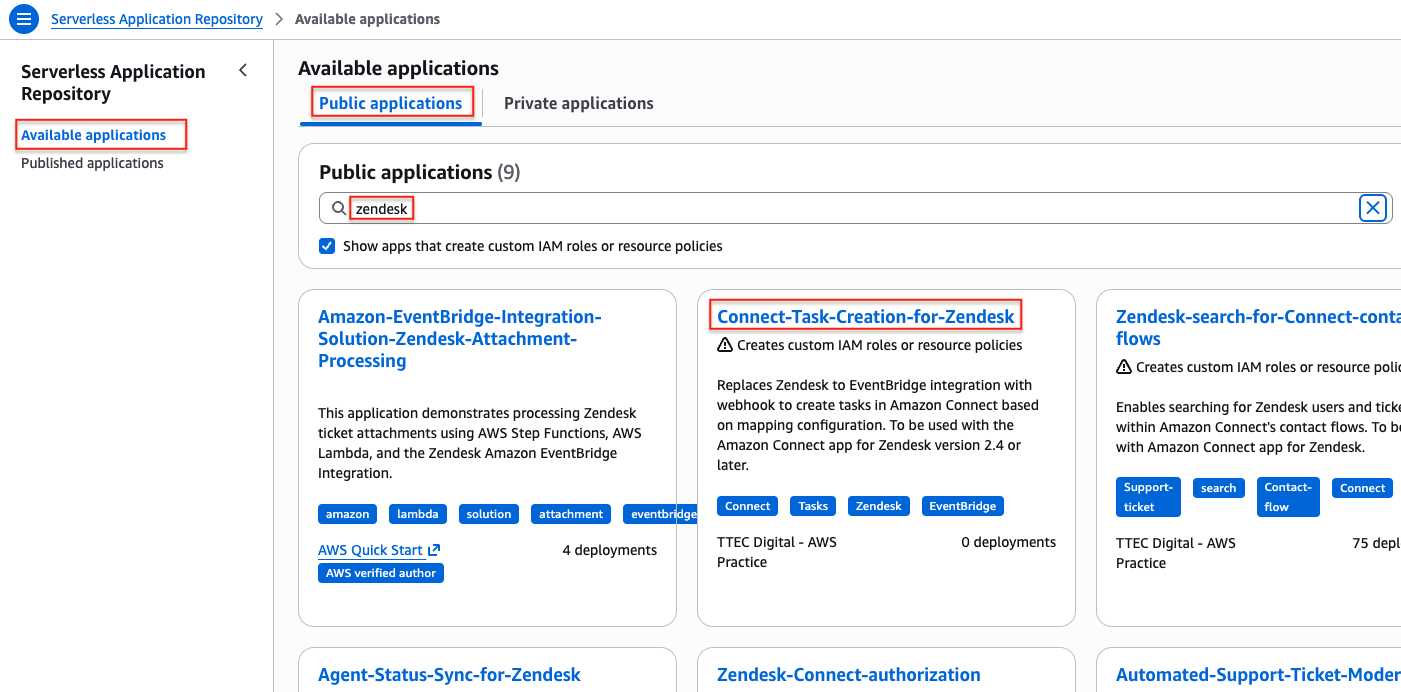
In the filtered list select Connect-Task-Creation-for-Zendesk.
Scroll down to Application settings.
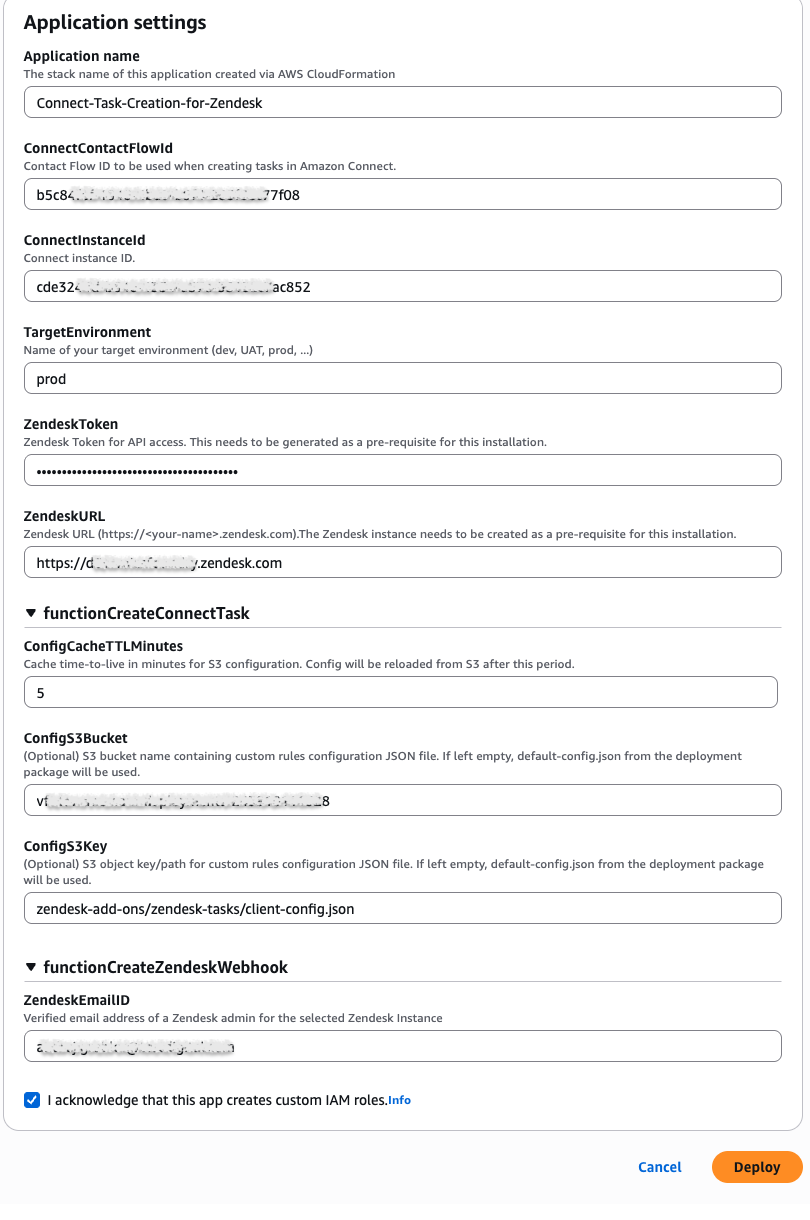
Enter the following information into the settings form:
Application name
Leave this as is.
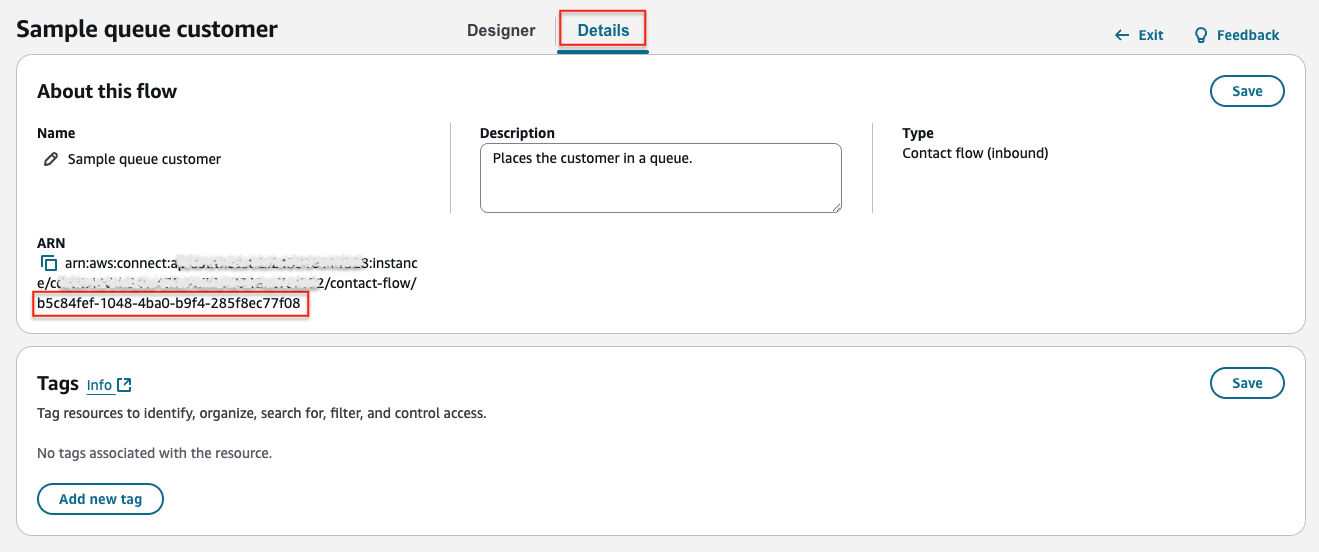
ConnectContactFlowId
When a task is created, it needs to be handed over to a Connect contact flow. In this contact flow you can use contact flow attributes made available via the task and, based on your business rules, route the task to appropriate queue or agent.
To get the contact flow ID of your selected contact flow, log into your Connect console, navigate to the selected contact flow and switch to the Details tab. Select and copy the last part of the ARN (after the last /):
Specified contact flow serves as default, if a contact flow ID is not specified in your custom configuration file (see the Configuration Structure section below)
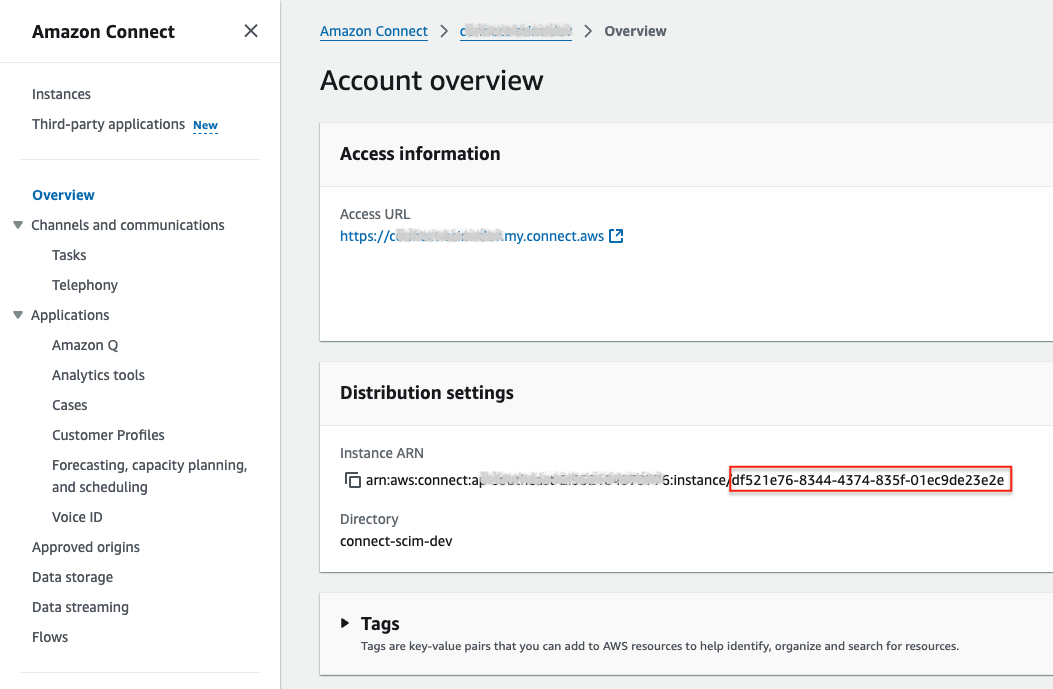
ConnectInstanceId
Enter the ID of the Connect instance.
To get your instance ID, log into your AWS console, select Amazon Connect service and from the list of instances select the one that’s associated with your Connect app.
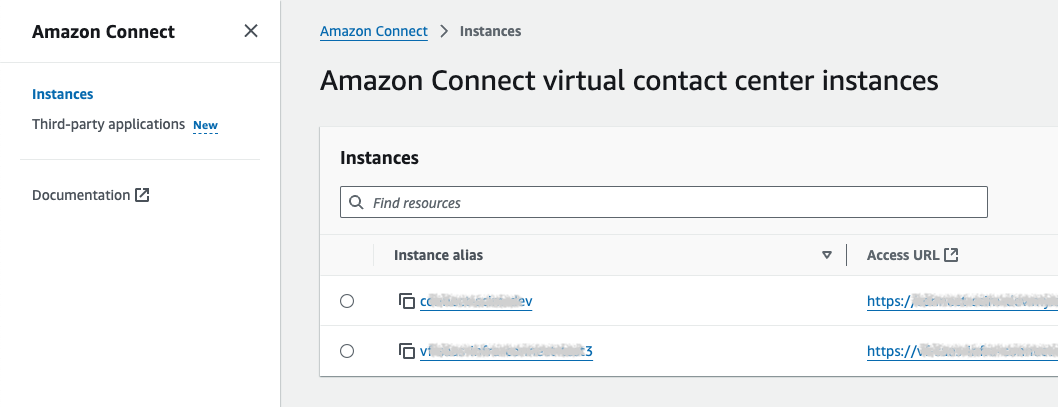
In the Account overview under distribution settings select and copy the last part of the instance ARN (after the last /):
Make a note of the Access URL of the instance and ensure it matches the Amazon Connect URL in your app installation settings. The app supports both the legacy URL format awsapps.com and the current my.connect.aws.
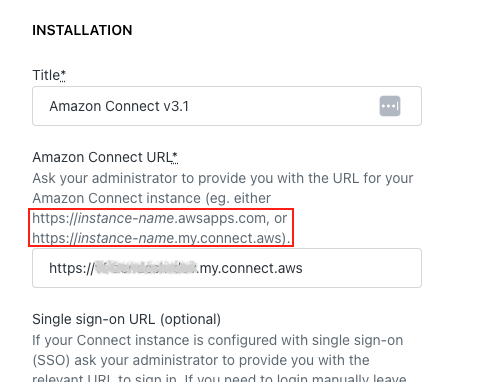
If the Amazon Connect app has been installed for some time, the installation setting could be using the old format whilst Amazon may have updated the Access URL to the new format. This would cause the deployment of the add-on to fail.
Ensure that the Amazon Connect URL in the app installation matches the Access URL listed with your Connect instance. Also, make sure to not include a / (slash) at the end.
TargetEnvironment
This is the name of the target environment (dev, UAT, prod etc). If unsure, just leave as prod.
ZendeskToken
Sign in to the Zendesk admin portal. Navigate to Apps and integrations → Zendesk API.
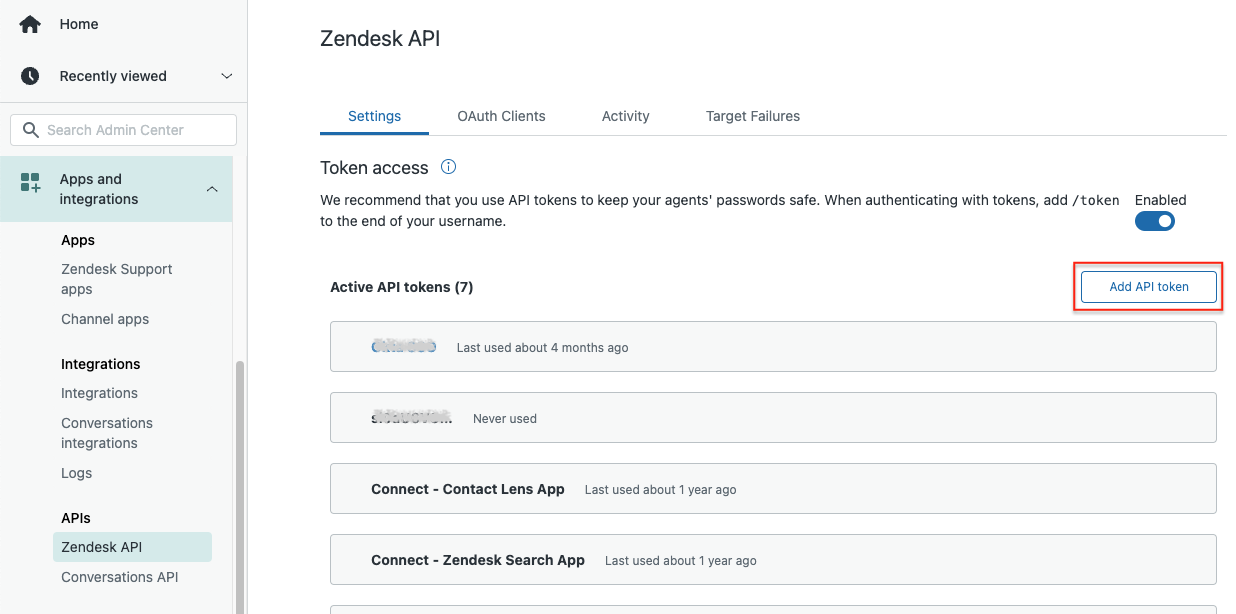
Click on Add API token.
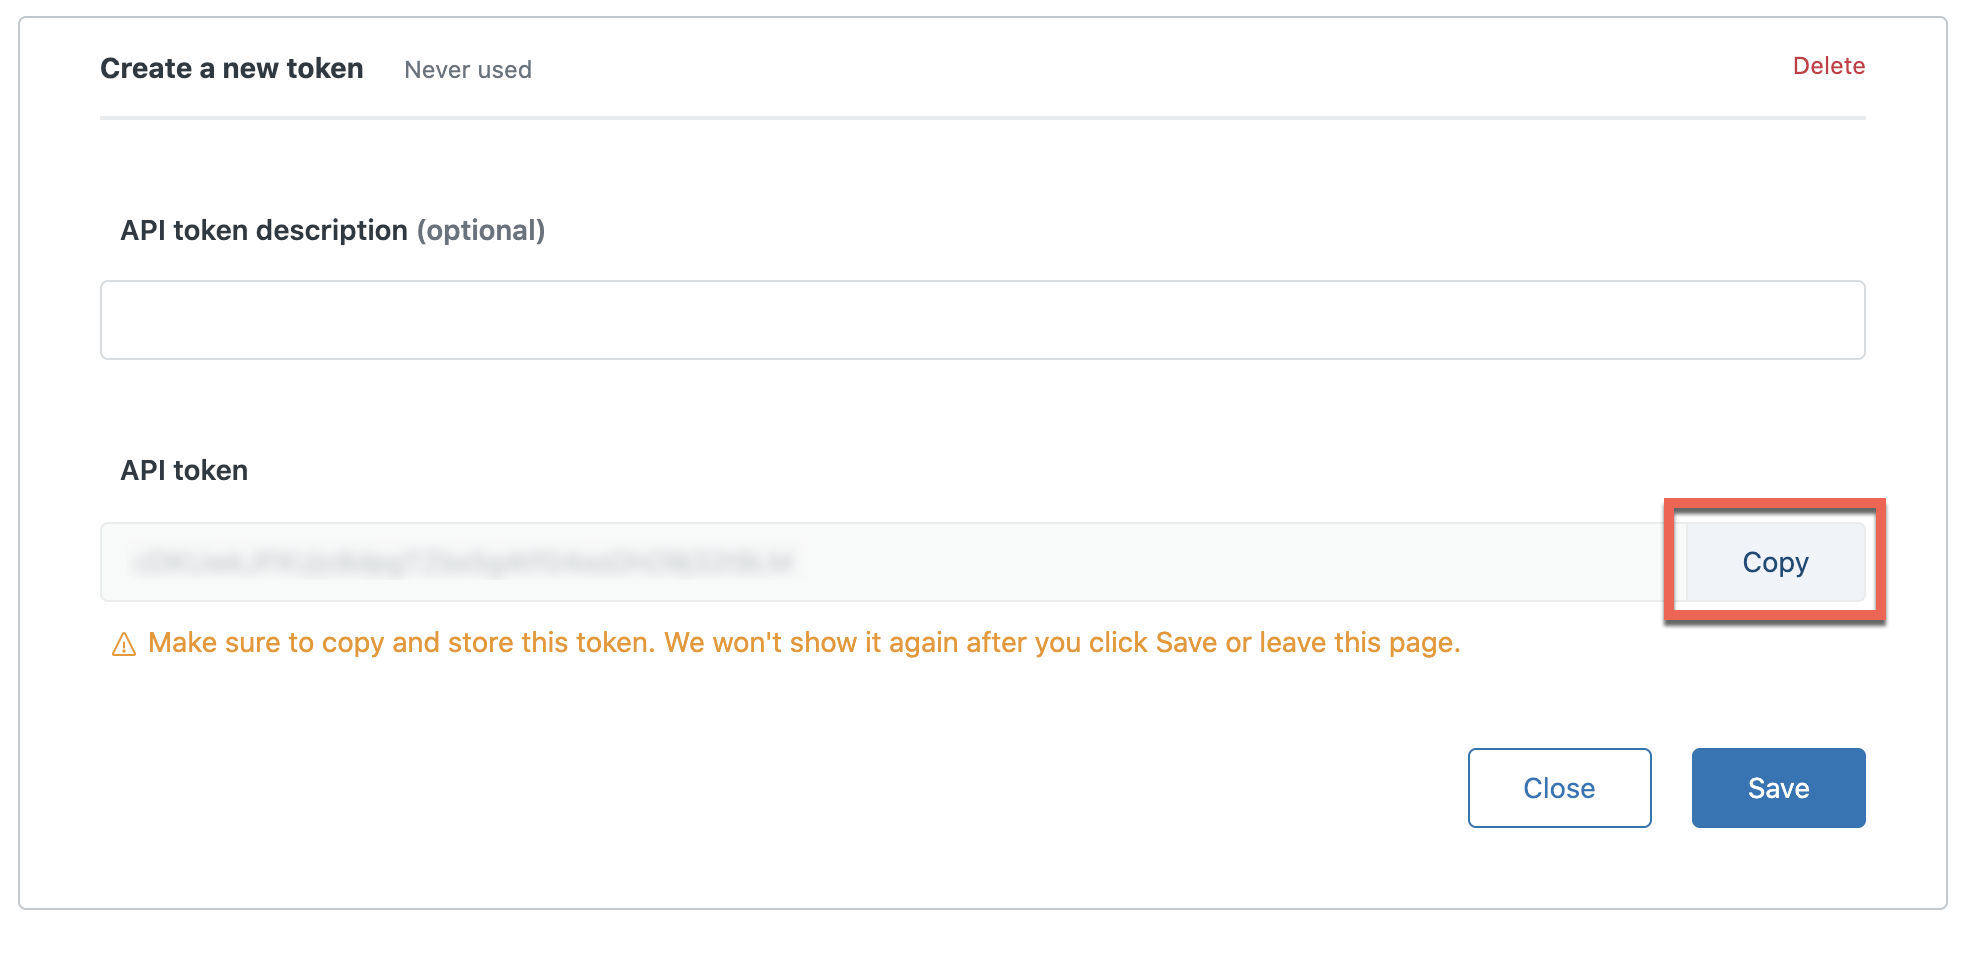
Click on Copy. Paste the API token into the ZendeskToken field.
ZendeskURL
Enter the URL of the Zendesk instance. Ensure the URL begins with https:// and do not include / at the end of the URL or the stack will fail.
ConfigS3Bucket
Enter the name of an S3 bucket where you intend to upload the configuration file. If you’re happy with default functionality (see below), you can leave it empty.
ConfigS3Key
Enter the full path of the configuration file, e.g. mySubfolder/ConnectTasks/myConfig.json. If you’re not providing your own configuration, leave it empty, same as the bucket name above.
ConfigCacheTTLMinutes
Enter a number of minutes before the cached configuration specified above expires. Defaults to 5.
ZendeskEmailID
Enter the verified email address of a Zendesk admin user for the Zendesk instance. It’s advisable to create a dedicated Zendesk user with admin privileges for the integration, so the functionality is not broken when a Zendesk user is removed (eg. if the related person leaves the company).
If any other either add-on features which require ZendeskEmailId is already installed, the existing user created for those can be re-used, as long as it has admin rights.
Tick the checkbox acknowledging that the app creates custom IAM roles and hit Deploy button.
When the installation is complete, you should see a new Zendesk webhook in your admin portal with two Zendesk Support events triggering it:
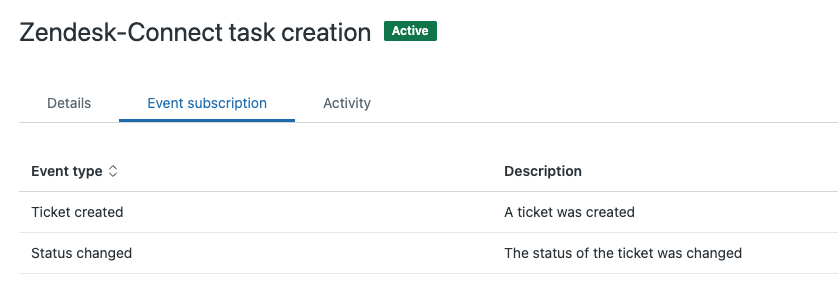
The default configuration after installation handles only the Ticket created event. It will create a task for each new, unassigned ticket. The task will have all the attributes as per the phased-out Zendesk EventBridge integration. You can use the attribute values to decide when and where to route the task.
If you’ve specified rules in your Connect instance to achieve more granular control over task creation, you’ll need to replicate them in your custom configuration file, as explained in the Task Configuration section below.
Installation Troubleshooting
If the installation is unsuccessful, use the CloudFormation stack that attempted to deploy the required infrastructure to confirm the root cause.
In the AWS console, navigate to CloudFormation service and select the stack of the SAR add-on, i.e. serverlessrepo-Connect-Task-Creation-for-Zendesk. Switch to Events tab and click on the button Detect Root Cause.
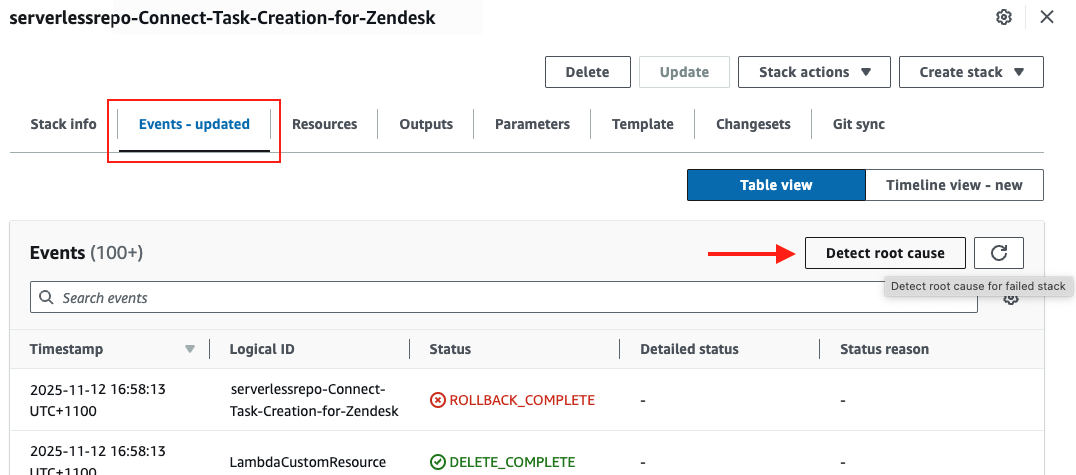
This should scroll down in the events table to the first event that caused the deployment to fail, e.g.
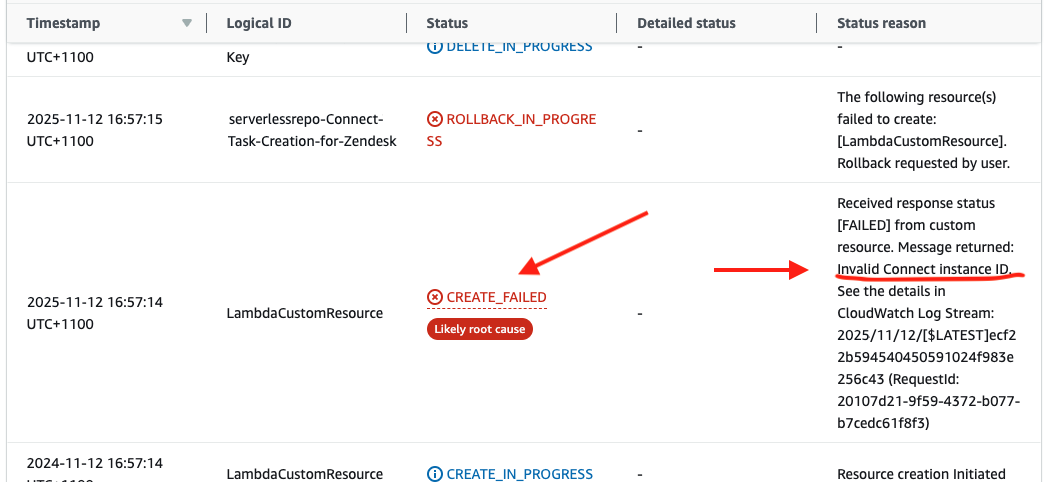
Review the Status reason. Most failures of this particular deployment fall into two categories:
lack of sufficient permissions to create resources. Ensure that the deployment is run under an admin account or account that has sufficient permissions to create all the required resources.
error response from the custom resource. This usually means that one or more parameters provided in the form above were incorrect. Review the message returned.
After establishing the root cause of the problem and are ready to try again, please make sure to delete the failed stack first.
If the root cause is not something you are able to fix yourself, please raise a support ticket with TTEC Digital.
Task Configuration
This section explains how to create and configure the JSON configuration file that controls when AWS Connect tasks are created from Zendesk events. The configuration uses a rule-based system to evaluate Zendesk ticket events and determine whether to create a task and its contents.
Configuration File Structure
The configuration file contains event-specific settings. Each event type (new-ticket or status-update) can have its own configuration:
{
  "new-ticket": {
    "rule-groups": [ /* array of rule groups */ ],
    "description": "Task description template",
    "attributes": [ /* array of Connect attribute names */ ],
    "references": { /* optional task references */ },
    "contactFlowId": "optional flow id"
  },
  "status-update": {
    "rule-groups": [ /* array of rule groups */ ],
    "description": "Task description template",
    "attributes": [ /* array of Connect attribute names */ ],
    "references": { /* optional task references */ },
    "contactFlowId": "optional flow id"
  }
}
Configuration Properties
Event Types
The configuration supports two event types:
Event Type | Zendesk Event | Description |
|---|---|---|
|
| Triggered when a new ticket is created |
|
| Triggered when ticket status changes |
Rule Groups
Rule groups define the conditions that must be met for a task to be created. Multiple rule groups are combined with AND logic (all groups must pass). Example:
{
  "rule-groups": [
    {
      "type": "all",
      "conditions": [
        { "field": "status", "operator": "==", "value": "open" },
        { "field": "priority", "operator": "==", "value": "high" }
      ]
    }
  ]
}
Rule Group Types
Type | Logic | Description |
|---|---|---|
| AND | All conditions in the group must evaluate to true |
| OR | At least one condition in the group must evaluate to true |
Condition Structure
Each condition has three properties:
{
  "field": "field_name",
  "operator": "comparison_operator",
  "value": "expected_value"
}
Description Template
The description field supports template placeholders that are replaced with actual field values:
{
  "description": "Ticket {{id}}: {{subject}} (Priority: {{priority}})"
}
Available placeholders: Any field name from the Available Fields table below, wrapped in {{ and }}.
Attributes
Array of Connect attribute names to include in the task. These map to the event fields. Example:
{
  "attributes": [
    "TicketId",
    "Priority",
    "Status",
    "Subject"
  ]
}
References (Optional)
Task references create clickable links in AWS Connect. Use template placeholders for dynamic URLs:
{
  "references": [
    {
      "name": "ticketRef",
      "url": "{{zendeskUrl}}/agent/tickets/{{id}}.json"
    }
  ]
}
Contact Flow ID (Optional)
Override the default Connect contact flow:
{
  "contactFlowId": "b5c84fef-1072-4ba0-b9f9-285f8ec77f08"
}
Available Fields
Field Types and Operators
Each field has a specific data type that determines which operators can be used:
String Fields
Supported Operators: ==, !=, contains, does_not_contain, starts_with, ends_with
Field Name | Description | Connect Attribute |
|---|---|---|
| ID of assigned agent |
|
| Zendesk brand ID |
|
| Ticket channel (web, email, chat, etc.) |
|
| Event type (new-ticket, status-update) |
|
| Ticket subject line |
|
| Ticket description | (not mapped) |
| External ticket ID |
|
| Zendesk form ID |
|
| Ticket ID |
|
| Organization ID |
|
| Requester user ID |
|
| Submitter user ID |
|
Option Fields (Enums)
Supported Operators: ==, !=
Field Name | Valid Values | Connect Attribute |
|---|---|---|
|
|
|
|
|
|
|
|
|
|
|
|
Date Fields
Supported Operators: ==, !=, >, <, >=, <=
Field Name | Description | Connect Attribute |
|---|---|---|
| Ticket creation timestamp |
|
| Last update timestamp |
|
Date Format: YYYY-MM-DDTHH:mm:ss.sssZ (e.g., 2025-11-17T10:00:00.000Z)
Array Fields
Supported Operators: contains, does_not_contain
Field Name | Description | Format | Connect Attribute |
|---|---|---|---|
| Ticket tags | Comma-separated string |
|
Operator Reference
String Operators
Operator | Description | Example |
|---|---|---|
| Exact match (case-insensitive) |
|
| Not equal (case-insensitive) |
|
| Contains substring |
|
| Does not contain substring |
|
| Begins with substring |
|
| Ends with substring |
|
Option Operators
Operator | Description | Example |
|---|---|---|
| Exact match (case-insensitive) |
|
| Not equal (case-insensitive) |
|
Date Operators
Operator | Description | Example |
|---|---|---|
| Equal to (exact timestamp) |
|
| Not equal to |
|
| After (greater than) |
|
| Before (less than) |
|
| On or after |
|
| On or before |
|
Array Operators
Operator | Description | Example |
|---|---|---|
| Array includes value |
|
| Array does not include value |
|
Configuring existing Connect task creation rules
To see your existing task creation rules, open your Connect console and navigate to Analytics and Optimisation/Rules. From the rule type dropdown select one of the two Zendesk ticket events and then open the rule you want to convert.
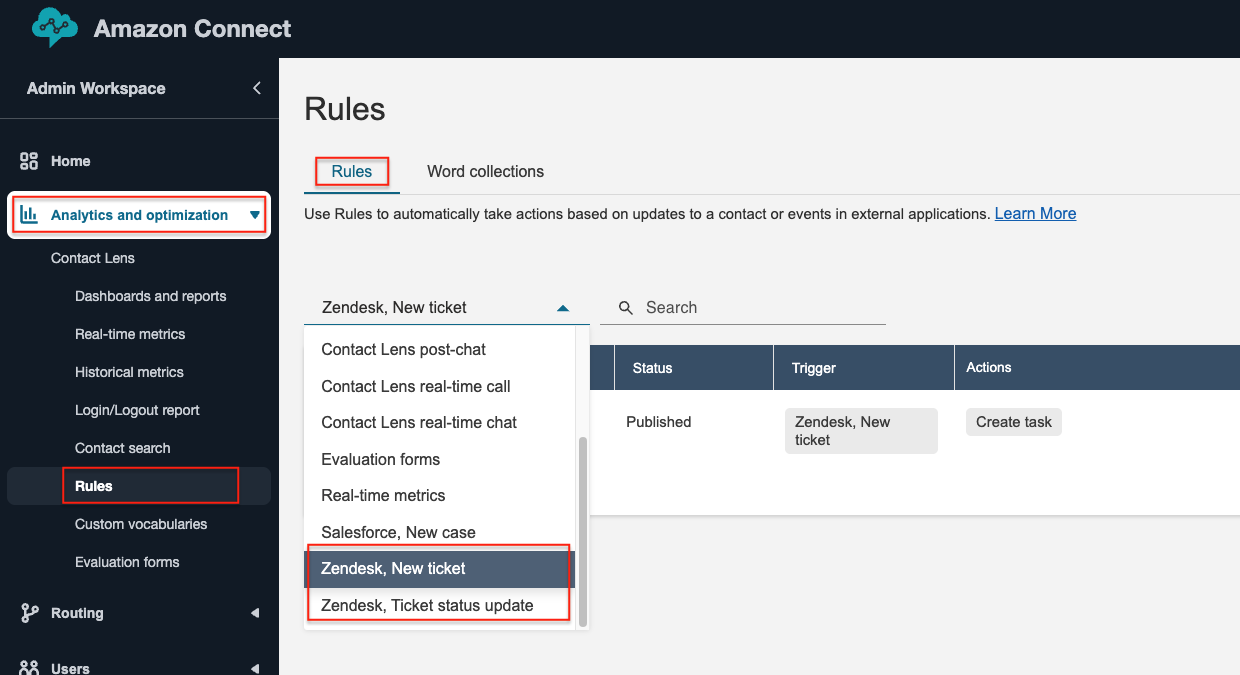
Example:
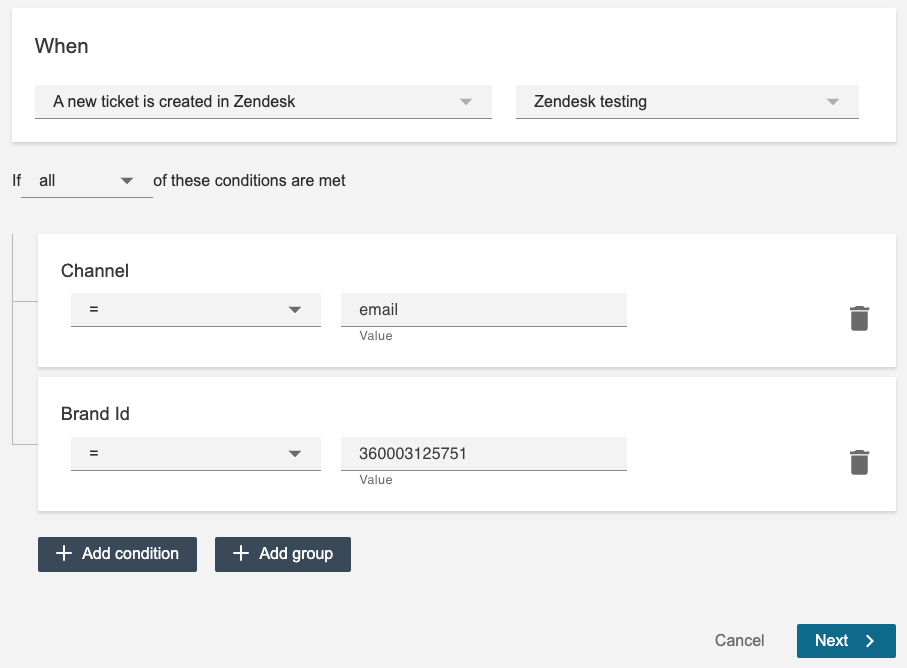
The above set of rules triggers when a new ticket is created and has just one rule group with two conditions.
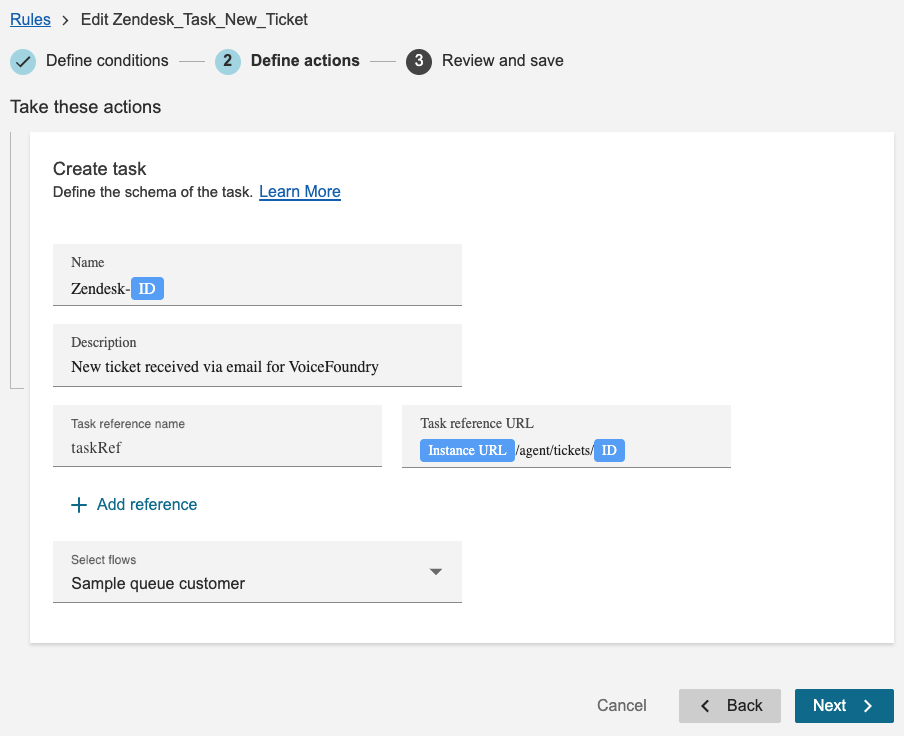
To replicate the task configuration above and its rules, we would set the following JSON structure:
{
  "new-ticket": {
    "rule-groups": [
      {
        "type": "all",
        "conditions": [
          { "field": "channel", "operator": "==", "value": "email" },
          { "field": "brand_id", "operator": "==", "value": "360003125751" }
        ]
      }
    ],
    "description": "New ticket received via email for VoiceFoundry",
    "attributes": [
      "Assignee_Id",
      "Brand_Id",
      "Channel",
      "Created_at",
      "Event_type",
      "External_Id",
      "Form_Id",
      "Organization_Id",
      "Priority",
      "Requester_Id",
      "Status",
      "Submitter_Id",
      "Tags",
      "TicketId",
      "Type",
      "Updated_at"
    ],
    "references": [
      {
        "name": "taskRef",
        "url": "{{zendeskUrl}}/agent/tickets/{{id}}.json"
      }
    ]
  }
}
Name property is hardcoded to Zendesk-{{id}} to ensure proper behaviour (popping up the ticket that triggered the task) in Amazon Connect app for Zendesk.
Other Configuration Examples
Example 1: High Priority Unassigned Tickets
Create tasks for high-priority tickets that are unassigned:
{
  "new-ticket": {
    "rule-groups": [
      {
        "type": "all",
        "conditions": [
          { "field": "priority", "operator": "==", "value": "high" },
          { "field": "assignee_id", "operator": "==", "value": null }
        ]
      }
    ],
    "description": "Unassigned High Priority Ticket: {{subject}}",
    "attributes": [
      "TicketId",
      "Priority",
      "Status",
      "Subject",
      "Requester_Id",
      "Created_at"
    ],
    "references": [
      {
        "name": "highPriorityTicket",
        "url": "{{zendeskUrl}}/agent/tickets/{{id}}.json"
      }
    ]
  }
}
Example 2: Status change of a high priority ticket
Create a task for a status change of an urgent or high priority ticket, unless closed:
{
  "status-update": {
    "rule-groups": [
      {
        "type": "all",
        "conditions": [
          { "field": "status", "operator": "!=", "value": "closed" }
        ]
      },
      {
        "type": "any",
        "conditions": [
          { "field": "priority", "operator": "==", "value": "urgent" },
          { "field": "priority", "operator": "==", "value": "high" }
        ]
      }
    ],
    "description": "Status changed to {{status}}: {{subject}}",
    "attributes": [
      "Assignee_Id",
      "Created_at",
      "External_Id",
      "Priority",
      "Requester_Id",
      "Status",
      "Submitter_Id",
      "Tags",
      "Type",
      "Updated_at"
    ]
  }
}
Example 3: Escalation Keywords
Create a task for a ticket (either new or re-opened) containing escalation keywords:
{
  "new-ticket": {
    "rule-groups": [
      {
        "type": "any",
        "conditions": [
          { "field": "subject", "operator": "contains", "value": "escalate" },
          { "field": "subject", "operator": "contains", "value": "urgent" },
          { "field": "subject", "operator": "contains", "value": "emergency" },
          { "field": "tags", "operator": "contains", "value": "escalation" }
        ]
      }
    ],
    "description": "ESCALATION: {{subject}}",
    "attributes": [
      "Assignee_Id",
      "Created_at",
      "External_Id",
      "Priority",
      "Requester_Id",
      "Status",
      "Submitter_Id",
      "Tags",
      "Type",
      "Updated_at"
    ]
  },
  "status-update": {
    "rule-groups": [
      {
        "type": "all",
        "conditions": [
          { "field": "status", "operator": "==", "value": "open" }
        ]
      },
      {
        "type": "any",
        "conditions": [
          { "field": "subject", "operator": "contains", "value": "escalate" },
          { "field": "subject", "operator": "contains", "value": "urgent" },
          { "field": "subject", "operator": "contains", "value": "emergency" },
          { "field": "tags", "operator": "contains", "value": "escalation" }
        ]
      }
    ],
    "description": "ESCALATION: {{subject}}",
    "attributes": [
      "Assignee_Id",
      "Created_at",
      "External_Id",
      "Priority",
      "Requester_Id",
      "Status",
      "Submitter_Id",
      "Tags",
      "Type",
      "Updated_at"
    ]
  }
}
Validation Rules
The configuration JSON is validated at runtime. Invalid configurations will prevent task creation:
Required Fields:
rule-groupsmust be an array with at least one groupEach group must have
type("all" or "any")Each group must have non-empty
conditionsarrayEach condition must have
field,operator, andvalue
Field Validation:
fieldmust match a known field nameoperatormust be valid for the field's data typeFor
optionfields,valuemust be one of the valid enum values
Date Validation:
Date values must be valid ISO 8601 format
Invalid dates will cause the condition to fail
Null Handling:
Null/undefined field values only pass for
== nullor!= <non-null>Other operators will fail on null values
Environment Variables
The following Lambda environment variables affect configuration:
Variable | Purpose | Used In |
|---|---|---|
| Base Zendesk URL | Template placeholders for references |
| S3 bucket for config | Config loader |
| S3 object key | Config loader |
| AWS Connect instance | Task creation |
| Default contact flow | Task creation (overridable) |
Best Practices
Start Simple: Begin with basic rules and add complexity as needed
Test Thoroughly: Validate your configuration with various ticket scenarios
Use Descriptive Values: Make conditions clear and maintainable
Leverage Templates: Use placeholders in descriptions and references for dynamic content
Consider Performance: Complex rule groups with many conditions may impact evaluation time
Document Custom Logic: Add comments in surrounding documentation to explain complex rule combinations
Version Control: Keep configuration files in version control with clear commit messages
Fallback Config: Maintain a
default-config.jsonas fallback when S3 is unavailable
Troubleshooting
Task Not Created
Check CloudWatch logs for rule evaluation results
Verify all conditions match expected values (case-insensitive for strings)
Ensure operators are valid for field types
Confirm option values match valid enums exactly
Invalid Configuration Errors
Validate JSON syntax
Check field names match exactly (underscores, not hyphens)
Verify operator spelling
Ensure date formats are ISO 8601
Template Placeholders Not Working
Verify field names in
{{placeholders}}are correctCheck that fields are included in
attributesarrayEnsure environment variables like
ZD_URLare set for references