
Administrator Guide
Terminology used
The following terminology is used within this document.
attribute | An Amazon Connect custom attribute which, if set within a contact flow, will override the default configuration set within the app’s settings. |
pop / popped | To automatically open a new tab (or shift focus to an existing one) in Zendesk for a specific user or ticket. |
auto assignment | Setting where tickets are created and/or assigned to the call automatically based on conditions and rules described in this document (default behaviour). |
manual assignment | Setting where users or tickets are presented to the agent (popped), and then it’s up to the agent to either create a new ticket (and for which user), or select an existing ticket and attach the call to it. To enable manual assignment set the attribute |
recognised customer | A customer that was identified as an existing Zendesk user. |
unrecognised customer | A customer that could not be identified as an existing Zendesk user. |
anonymous customer | A customer whose CLI came across as “anonymous” or “private” and therefore could not be identified as an existing Zendesk user. |
user profile | A Zendesk user profile. |
contact flow | An Amazon Connect contact flow. |
app setting | The Amazon Connect app settings. To view or edit the app’s settings in Zendesk, go to admin, click on manage under apps and select the Amazon Connect app. |
Contact flow attributes
Contact attributes are used to set the behaviour of the app. Contact attributes can be set within your contact flows. An attribute can be set to the same desired value at the start of every contact flow, or can be set dynamically, based on the business logic of the containing flow.
Below is a list of the configuration settings for each contact attribute, each with its default setting and the name of the attribute that overrides that default, if set in the contact flow.
Any attributes set within a contact flow will override its corresponding app setting.
Setting name | Attribute name | Description | Default setting | App setting name | Attribute values |
|---|---|---|---|---|---|
Recent ticket timeout | recent_ticket_timeout | This setting controls whether a recent ticket of a recognised caller should be opened instead of creating a new one. E.g. setting this to 15 means that a new ticket will be created if there hasn’t been a ticket created or updated in the last 15 minutes for that user. | 0 | Create ticket after minutes | numerical value (in minutes) |
Ticket assignment behaviour | ticket_assignment | Determines how tickets are created or assigned to a call. When set to auto a new ticket will be created for each call. When set to agent the agent will have control over the creation of new tickets or selecting from existing ones to attach the call to. | auto | Does not have an app setting. Can only be set within a contact flow. | auto; agent |
Pop customer or ticket details before accepting the call | pop_incoming | If this option is set to false then customer or ticket details will be displayed in Zendesk only after the agent accepts the incoming call. | true | Does not have an app setting. Can only be set within a contact flow. | true; false |
Insert call details with embedded call recording | voice_comment | When set to true, call details such as where the call originated from, who answered it, time and length of the conversation and audio recording of the call with embedded player will be attached to the ticket. | true | Does not have an app setting. Can only be set within a contact flow. | true; false |
Provide a link to download the call recording file | download_recording | When set to false, a link to download the audio file (.wav) of the call recording and embedded player will NOT appear in the attached voice comment. | true | Does not have an app setting. Can only be set within a contact flow. | true; false |
Call recording consent | call_recording_consent | Set this to false or optout when you’re not recording the conversation. | null | Does not have an app setting. Can only be set within a contact flow. | optout, false; |
Dialled number | dialed_number | The number reported in tickets as the number that the caller dialled in inbound calls. This is usually set in contact flows from | null | Default entry point phone number | Phone number in E.164 format only |
Outbound CLI | outbound_cli | The number reported in tickets as the number that the agent dialled out from in outbound calls. This is usually set in contact flows from | null | Default entry point phone number | Phone number in E.164 format only |
Zendesk ticket number | zendesk_ticket | If this attribute is set in a contact flow the ticket number specified will be opened, instead of creating a new one. NOTE: the name of this attribute can be changed in the corresponding app setting. | null | Contact attribute name containing Zendesk Ticket Number. | Zendesk ticket number (entered by caller within IVR) |
Conversation title | conversation_title | When set, the contents of this attribute will set the subject of a newly created ticket, instead of the usual “incoming/outgoing call …”. It will also set the title of the voice comment for calls. | null | Does not have an app setting. Can only be set within a contact flow. | Subject line, set by IVR |
Zendesk user ID | zendesk_user | The ID of an existing Zendesk user. If this is set in a contact flow the app will disregard the caller’s CLI and search for a user by this ID. | null | Does not have an app setting. Can only be set within a contact flow. | Zendesk user ID (entered by caller within IVR) |
Customer’s phone number | customer_number | Customer's phone number can be entered in the contact flow (using Store Customer Input block with phone number). If this is set in a contact flow the app will disregard the caller’s CLI and search for a user by this attribute. | null | Does not have an app setting. Can only be set within a contact flow. | Customer phone number (entered by caller within IVR) |
Customer’s name | customer_name | Although Zendesk may treat a customer as an unrecognised caller, their name could be obtained from another source, eg. sales database within the contact flow. Using this attribute that name would then be applied to the newly created Zendesk user instead of the CLI. | null | Does not have an app setting. Can only be set within a contact flow. | Customer’s name entered via chat or set in IVR |
Customer’s email | customer_email | When this attribute is present its value will be used to identify the customer when the contact type is chat and no zendesk_user attribute (see above) is present. | null | Does not have an app setting. Can only be set within a contact flow. | Customer’s email entered via chat or set in IVR |
Customer’s language | customer_language | A 2-letter language code, required for speech analysis. Supported language codes are: en, es, fr, de, it, pt, ar, hi, ja, ko, zh, and zh-TW. | en | Does not have an app setting. Can only be set within a contact flow. | 2-letter language code only |
Force ticket creation | force_ticket_creation | When the ticket assignment attribute is set to agent, this attribute will determine whether to force create a ticket after the call finishes, if the agent hasn't already created or assigned a ticket during the call. | true | Does not have an app setting. Can only be set within a contact flow. | true; false |
Pause / resume recording | pause_recording | Allows the agent to pause and resume a call recording, assuming recording has been turned on. | null | Does not have an app setting. Can only be set within a contact flow. | true; false |
Create a ticket on every outbound call | all_outbound | By default, tickets will not be created for outbound calls to unknown numbers. When this attribute is set to true, a new user will be automatically created along with a new ticket. | false | Does not have an app setting. Can only be set within a contact flow. | true; false |
Chat transcript | chat_transcript | When set to | true | Does not have an app setting. Can only be set within a contact flow. | true; false |
VoiceID enabled | voiceid_enabled | This flag is used to update a calling customer with their unique voice id and enrolment status (see detailed explanation in the VoiceID section below) | false | Does not have an app setting. Can only be set within a contact flow. | true; false |
Zendesk user field for voice ID identifier | voiceid_field | Value of the field key of the Zendesk custom user field where the VoiceID unique id should be stored | voice_authentication_id | Does not have an app setting. Can only be set within a contact flow. | a valid Zendesk user field key |
Zendesk user field for voice ID status | voiceid_status_field | Value of the field key of the Zendesk custom user field where the VoiceID status should be stored (status can be | voice_authentication_status | Does not have an app setting. Can only be set within a contact flow. | a valid Zendesk user field key |
VoiceID authentication mode | voiceid_auth_mode | Drives Voice authentication in connected state. | null | Does not have an app setting. Can only be set within a contact flow. | null, verify, re-verify |
Ticket brand | ticket_brand | Sets the brand of the ticket when creating a new ticket. See more information. | null | Does not have an app setting. Can only be set within a contact flow. | a valid brand name, setup in Zendesk Admin portal |
Ticket outbound queue | ticket_outbound_queue | Sets a custom Zendesk ticket field with a queue name, which is subsequently used when dialling from the ticket. See more information. | null | Does not have an app setting. Can only be set within a contact flow. | a valid outbound queue name |
App settings
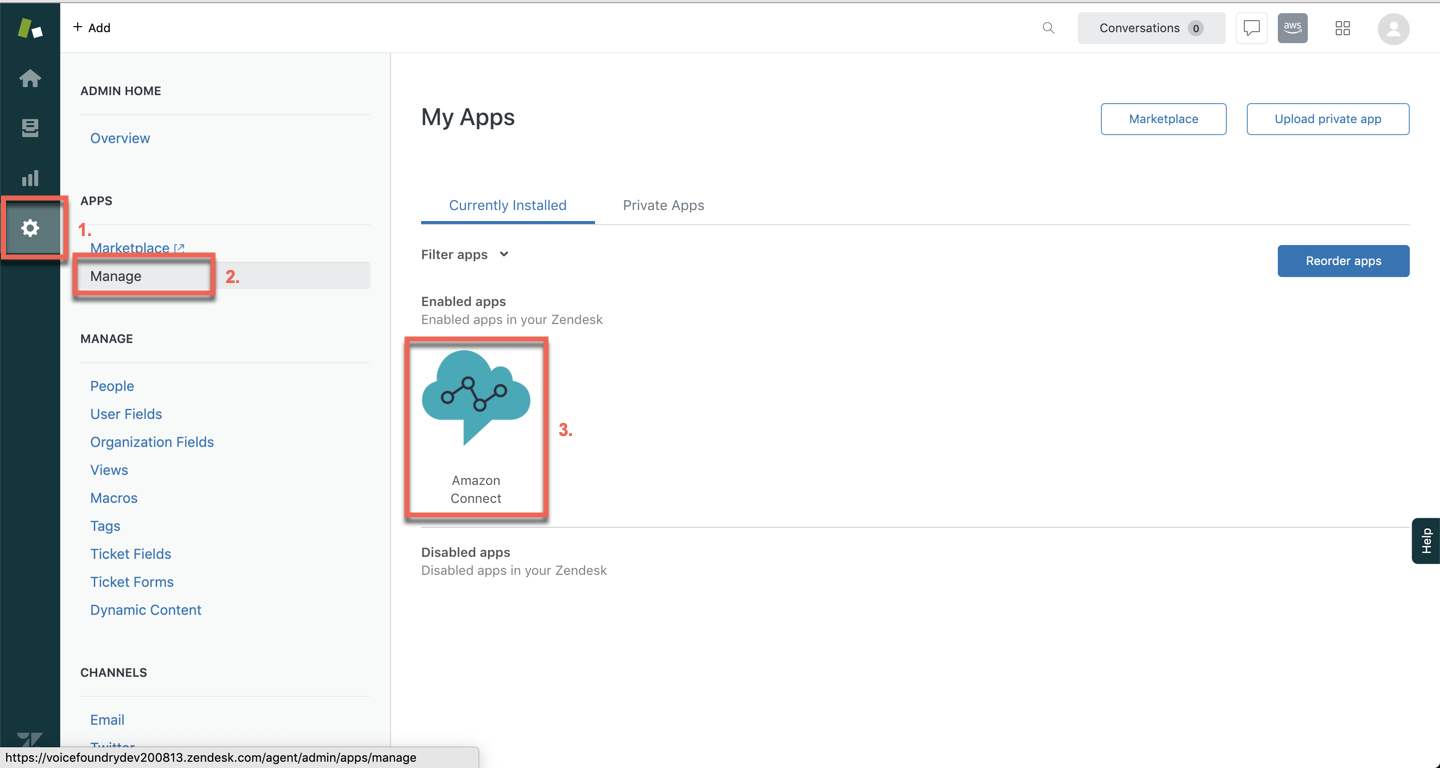
The app’s settings are configured in Zendesk. To view/edit the app’s settings, go to your Zendesk instance. Click on the admin icon in the left navigation bar, and under apps select manage. Click on the Amazon Connect app.
Default settings and assumptions
The default settings specify the behaviour of the app if no contact attributes have been set within your contact flows. Default settings for the app are as follows:
Setting name | Default setting | Default description |
|---|---|---|
Recent ticket timeout | not set | |
Ticket assignment behaviour | auto | By default, a new ticket is created for each call. |
Pop customer or ticket details before accepting the call | true | By default, customer or ticket details will pop for the agent before they accept a call. |
Insert call details with embedded call recording | true | By default, call details with embedded call recording will be attached to every call. |
Provide a link to download the call recording file | true | By default, a link to download the call recording file will be attached to every call. |
Force ticket creation | true | By default, a ticket will be automatically created after the call finishes, if the agent hasn't already created or assigned a ticket during the call. Note this only applies when the ticket assignment attribute is set to agent. |
Dialled number | not set | |
Outbound CLI | not set | |
Zendesk ticket number | not set | |
Zendesk user ID | not set | |
Customer’s phone number | not set | |
Customer’s name | not set | |
Customer’s language | en | By default, the language for speech analysis is set to english. |
Advanced speech analysis | not set | |
Create a ticket on every outbound call | false | By default, tickets will not be created for outbound calls to unknown numbers. |
Chat transcript | true | By default, the chat transcript will be attached to a ticket after the end of a chat. |
VoiceID enabled | false | By default, no VoiceID updates of the calling customer will take place. |
Zendesk user field for voice ID identifier | voice_authentication_id | This is the default Zendesk user field key which the app will use to store VoiceID identifier |
Zendesk user field for voice ID status | voice_authentication_status | This is the default Zendesk user field key which the app will use to store VoiceID status |
VoiceID authentication mode | not set |
Customer identification for chats
Recognising a customer from a chat involves using a Lex bot to extract identifying details from the customer and calling the Zendesk search API (which is available as an existing add-on). In the end, the resulting customer ID should be put in the zendesk_user custom attribute within your contact flow which is then used in the app to uniquely identify the customer..
Alternatively, if the Zendesk search API is not used and your LEX bot just retrieves the customer’s name, this can be used to search for the customer as well. To do this, pass through the customer’s name through the custom attribute customer_name. If a single customer match is found, that customer’s user profile will pop for the agent. If there are multiple matches with the same name or email, the app will change its ticket assignment behaviour to agent and a notification message will pop, suggesting to the agent to do a search within Zendesk and select the appropriate user profile.
If a customer cannot be identified the app will change its ticket assignment behaviour to agent and the agent can create a new user and then click on the create ticket button to create a new ticket attached to this user.
Alternatively, the agent can first identify the customer and if they are an existing user the agent can navigate to the existing user’s profile and click on the create ticket button to create a ticket for that user.
The agent may also establish if the chat relates to one of the user’s existing tickets and attach the chat to it by opening the ticket and then clicking on the attach to current button.
Attaching chat transcript
When either party ends the conversation an additional private comment is added to the ticket containing the chat transcript. The chat transcript contains messaging between the agent and the customer but also status messaging, such as when either party joins or leaves the conversation and chat messages from the chat bot (Connect system messages).
The custom attribute chat_transcript controls whether the transcript gets attached to the ticket or not (default is true). This way the you can choose to not include it by setting the attribute in the contact flow to false.
Enabling media-less mode
Media-less mode detaches the audio channel from the embedded Connect softphone within your Zendesk instance. The embedded softphone continues to function in all other aspects, such as accepting the call, creating and/or attaching call details to a Zendesk Support ticket, transferring a call to another agent, etc. The audio channel on the other hand needs to be handled by a separate instance of your Contact Control Panel (CCP), which must be launched before the agent starts receiving calls in the connector app.
Virtual Device Infrastructure (VDI) environments
The main purpose of media-less mode is to facilitate the use of the connector app in Virtual Device Infrastructure (VDI) environments where the standard embedded softphone won’t work.
Page and app refreshes
Another use of media-less mode is to bridge the otherwise interrupted audio channel when an agent reloads the Zendesk browser tab.
Normally, when a reload (or refresh) happens, the standard embedded softphone CCP reinitialises and therefore breaks the audio connection with the other party (e.g. customer). In media-less mode it is the external CCP that is open in a seperate tab that caries the audio connection which is unaffected by the reload of the embedded softphone within Zendesk.
This enhancement enabled us to refactor the embedded softphone in such a way that it seamlessly “survives” page reloads and apps refreshes. Call processing and ticket assignment logic continues as if the reload didn’t happen.
VoiceID setup
Amazon Connect Voice ID, a feature of Amazon Connect, uses machine learning to provide real-time caller authentication and fraud risk detection to make voice interactions faster and more secure. You can read more about it here.
VoiceID is a feature of Amazon Connect which is independent from Zendesk connector app, in other words, it’s already implicitly supported by the app via the embedded CCP.
The Amazon Connect app for Zendesk ads some enhancements which will improve both customer and agent experience and also improve Zendesk reporting on the uptake of VoiceID.
First, as an admin, you will need to setup two custom Zendesk user fields with the following keys:
voice_authentication_id: this will hold a unique id linked to customer's voiceprintvoice_authentication_status: this will have the VoiceID enrolment status, which can be one of: blank (not enrolled),ENROLLEDorOPTED_OUT
The above two field keys can be named differently if required. In such case you need to set these names in the respective contact flow as follows:
for voice authentication id, set the field key in the
voiceid_fieldcontact attributefor voice authentication status, set the field key in the
voiceid_status_fieldcontact attribute
Second, you will need to install the Zendesk Search add-on from AWS Serverless application repository. This add-on will enable search and retrieval of the calling customer’s information, including the above listed user fields.
Third, you will need to construct a contact flow (sample available from our portal) in a certain way, to achieve the full benefit of these enhancements.
Customer and agent experience will be as follows:
A customer calls for the first time, or is not recognised, or is an existing customer but not yet enrolled or opted out (their VoiceID status is blank). A globally unique id is setup as their VoiceID identifier - the contact id can be used for that purpose. VoiceID session is initiated and contact attribute
voiceid_enabledis set to true (used by the connector app at the end of the call).The call is placed into a queue and routed to an agent, who accepts the call. The VoiceID UI is displayed to the agent where they can see that the customer is not yet enrolled. Agent can then suggest to the customer to be enrolled into VoiceID. If the customer accepts the agent can enrol them via VoiceID UI. If they decline the agent marks them as opted out (via the same VoiceID UI).
At the end of the call, the app checks customer’s enrolment status and saves it into their voice authentication status Zendesk user field. It also saves the generated voice authentication id into respective Zendesk user field.
Later, when that same customer calls again and are identified by the Zendesk-Search add-on, the contact flow looks into their enrolment status and takes one of the two paths:
If the enrolment status is
ENROLLED, the IVR asks the customer to speak for about 10 seconds, so that they can be verified by their voiceprint. VoiceID verifies them against the stored authentication id, retrieved from the respective Zendesk user field. If they are successfully authenticated, agent will see that immediately upon being connected. If they are not authenticated though or authentication result is inconclusive, theticket_assignmentcontact attribute will be set toagent(manual), so that the call and the related Zendesk support ticket is not automatically attributed to a potentially wrong customer.When the enrolment status is
OPTED_OUT, the IVR will skip voice verification and will route the call to an agent who will be able to see that customer is not opted into the VoiceID.
Regardless of current enrolment status, customer can always request a change. So they can decide to opt out after being already enrolled, or the opposite - request to be enrolled after they’ve opted out. The connector app will store their updated status in the respective Zendesk user field.
Enhanced Monitoring and Multi-party Calls
Enhanced monitoring is Amazon Connect’s functionality for supervisors to either silently monitor agent calls, or barge-in to a call to assist the agent. This feature is enabled in Amazon Connect configuration together with Multi-party calls.
The act of monitoring (both legacy and enhanced) will have no effect on the ticket created by the agent. For the enhanced monitoring to work correctly the supervisor has to be in the Offline state. Upon connecting to an existing call for monitoring the ticket related to the monitored call will automatically display (pop) for the supervisor. Note that this feature applies only to the enhanced monitoring.
Multi-party calls will enable agents to add up to 4 additional participants (ie. 6 in total) to a call through either quick connects or the number pad. Agent’s Connect experience will be governed per the enhanced Contact Control Panel UI (described here).
Multi-party calls should not create multiple Zendesk tickets. Instead, all agent parties (legs) should be reported on the same ticket. This behaviour closely matches the current behaviour with transfers - for each added agent call leg, that agent’s connector app will search for a ticket with the original Contact ID. If found, it will automatically pop and the call leg details will be added to it. If not found, the agent will be automatically set into the manual ticket assignment mode, where they will have the ability to search for the ticket and then attach their call leg to it.
Sometimes, ticket can’t be found due to Zendesk indexing lag, or if the agent doesn’t have permission to view the ticket, for example if the ticket is assigned to a private group which the agent is not a member of.
It can also happen if the first agent hasn’t created a ticket yet because they were in manual assignment mode. After a ticket is created, the first agent can let other agents on the call know the ticket id, so other agents can then find it via Zendesk search and attach their call legs to it (assuming they have required permissions).
Amazon Connect Information
Contact Lens supports calls with up to 2 participants. For example, if there are more than two parties (agent and customer) on a call, or a call is getting transferred to a third party, the quality of the transcription and analytics, such as sentiment, redaction, categories among others, can get degraded. We recommend you disable Contact Lens for multi-party or third-party calls if there are more than two parties (agent and customer). For information on disabling Contact Lens for a contact, see Flow block: Set recording and analytics behavior.
Integration with Amazon Connect Tasks
You need to have the Amazon EventBridge integration enabled by Zendesk Support before you can configure Amazon Connect Tasks
Zendesk and Amazon Web Services support integration between platforms via Amazon EventBridge, where a Zendesk event, such as Support ticket creation, can be captured and processed in EventBridge. An example integration is automatic Amazon Connect task creation on such event.
You can can configure an integration of Zendesk support tickets with Amazon Connect tasks, so that certain ticket events (eg. create, update) automatically create a corresponding task in Amazon Connect which then routes it according to configured routing rules.
To achieve this you need to establish Zendesk → Amazon EventBridge integration and configure associated task creation rules. Zendesk and Amazon Web Services support the integration between platforms via Amazon EventBridge, where a Zendesk event, such as Support ticket creation, can be captured and processed in EventBridge. In our case that process is automatic Amazon Connect task creation on such event.
Tasks that are created via such integration follow a naming convention where the task name field is in the format of Zendesk-nnnn where nnnn stands for Zendesk ticket number.
As such a task is routed to an agent, the connector app will offer it to the agent and automatically pop the related Zendesk ticket. If the agent accepts the task, it’s details will be added as a private note to that ticket, same as they would for accepted call.
Brands and Queue Mapping
NEW IN RELEASE V2.8
Zendesk Support allows you to configure multiple brands that your business may hold. A brand can then be assigned to each support ticket. Amazon Connect for Zendesk app now supports automatic assignment of brands for incoming contacts.
Apart from serving various other purposes, ticket brand field can also help in determining the appropriate outbound queue to be used when dialling from the ticket. This way we can assure the Calling Line Identification (CLI) of the outbound call will be the same as the number your customer originally dialled when the ticket was created.
If you don't have an applicable license or do not use multiple brands you can utilise other outbound queue selection methods as described further down in this guide.
When a ticket is created for an inbound Connect contact, the brand selection is based on either the queue of the inbound contact (call or chat) or value of the contact flow attribute ticket_brand. When using queue mapping, each queue can be configured with a respective brand, and multiple queues can be assigned to the same brand. Queues are mapped to brands via a mapping configuration described below.
Queue mapping takes priority over the ticket_brand attribute.
If a queue isn’t mapped to a brand and the ticket_brand attribute is not set, the default brand will be automatically assigned, unless Zendesk is configured to require end users (agents) select a brand manually before saving.
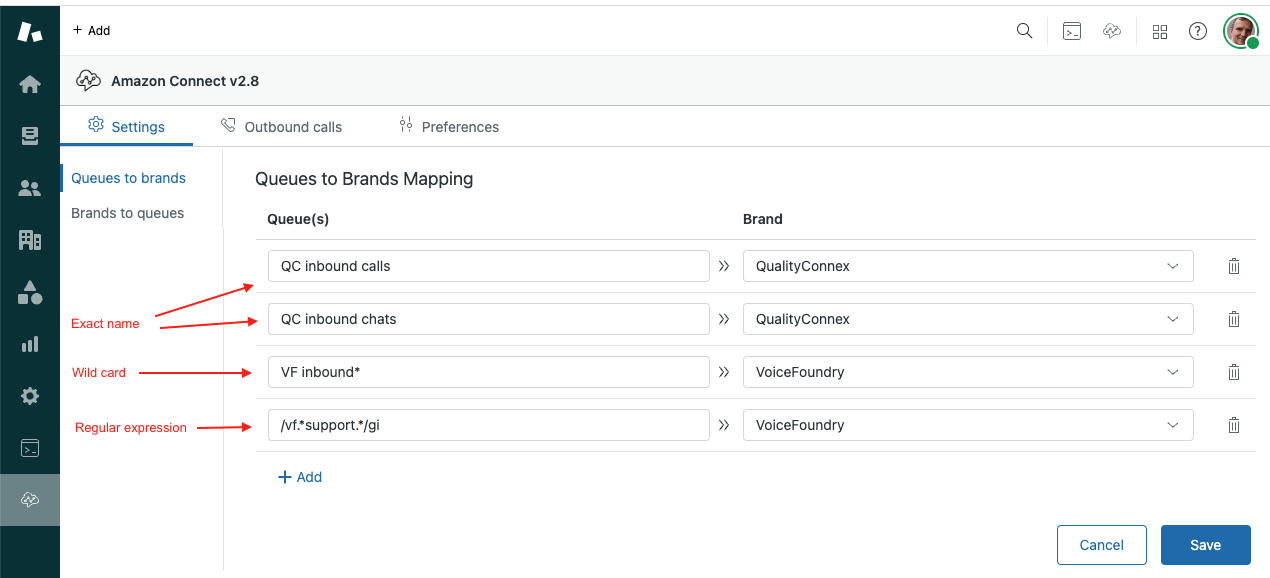
Queues to Brands Mapping
To map an Amazon Connect queue to a Zendesk brand open the app’s central area from the left nav bar. The Settings tab should be automatically selected as well as the first option from the settings menu - Queues to brands:
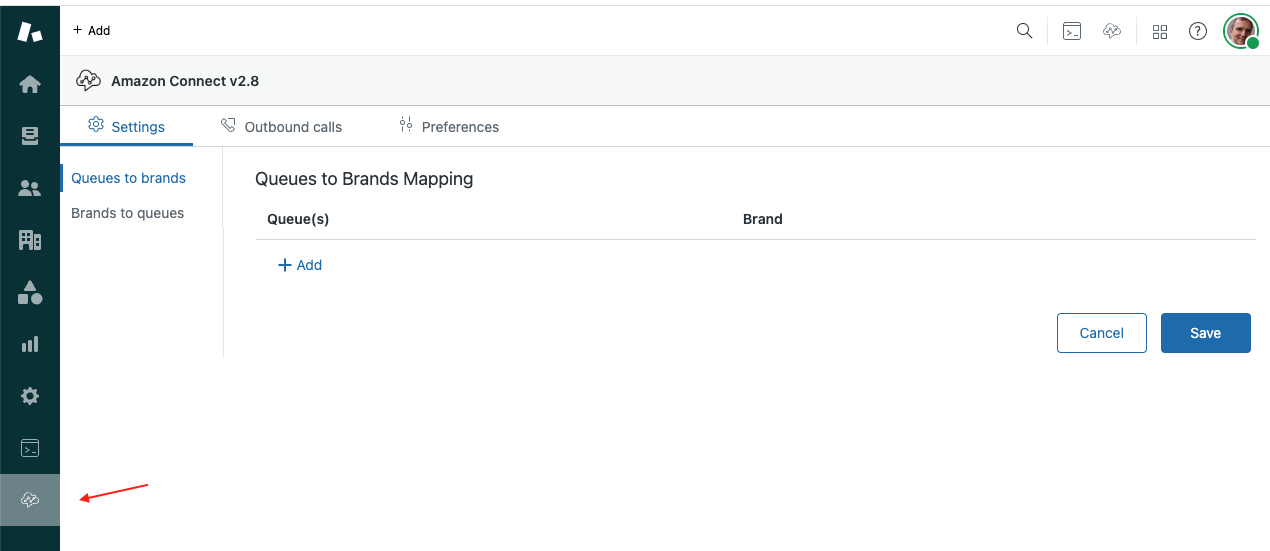
Settings tab and its menu are visible only to Zendesk users in Admin role. It also won’t display unless you have at least two brands configured and active in your Zendesk admin portal.
At first, the list will be empty. Click on the + Add button , enter the name of the queue and then select the appropriate brand from the dropdown.
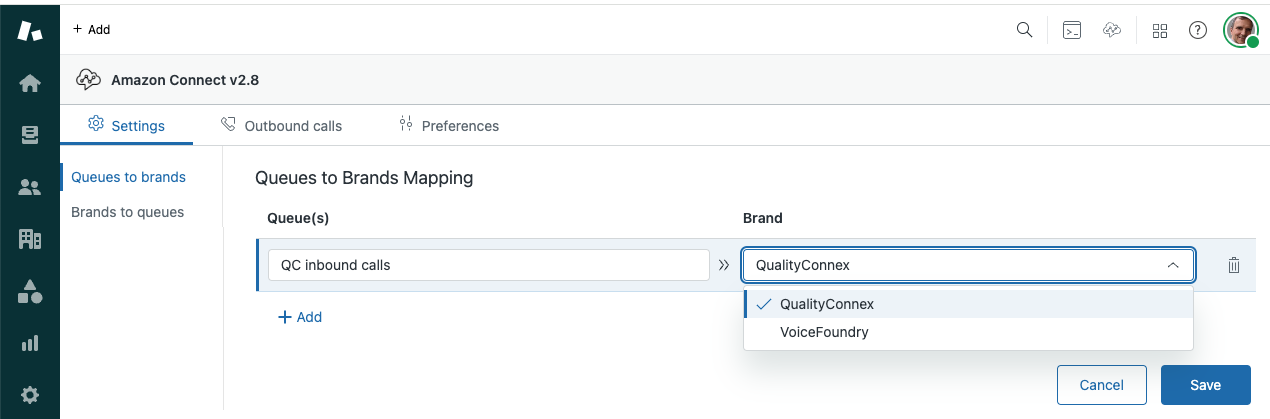
Continue with adding more queues and their associated brands. For each mapping you can specify either a single queue or use wild cards and regular expressions to specify a group of queues:
wild cards:
use
*at the end of the phrase, to specify a group of queues whose names all start with that phrase, e.g.MyCorp *use
*at the start of the phrase, to specify queues whose names all end with that phraseuse
*at the start and the end of the phrase, to specify queues whose names contain that phrase
regular expression: for advanced users, regular expressions can specify complex patterns to match a specific group of queues. Regular expressions must start with a
/character and be valid.
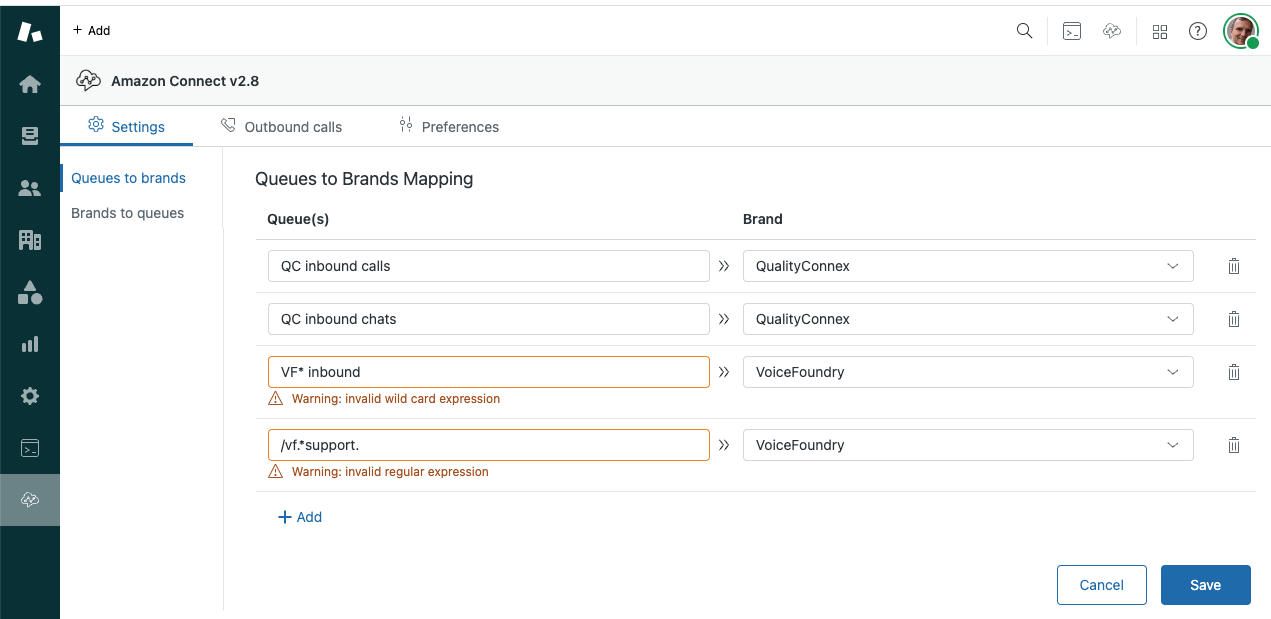
The app will check for correctness of wild cards and regular expressions and will display a warning in case of incorrect syntax. It will however let you save the mapping. Invalid wild card or regular expressions will then be treated as a single queue name, e.g. Special queue for 5* ratings.
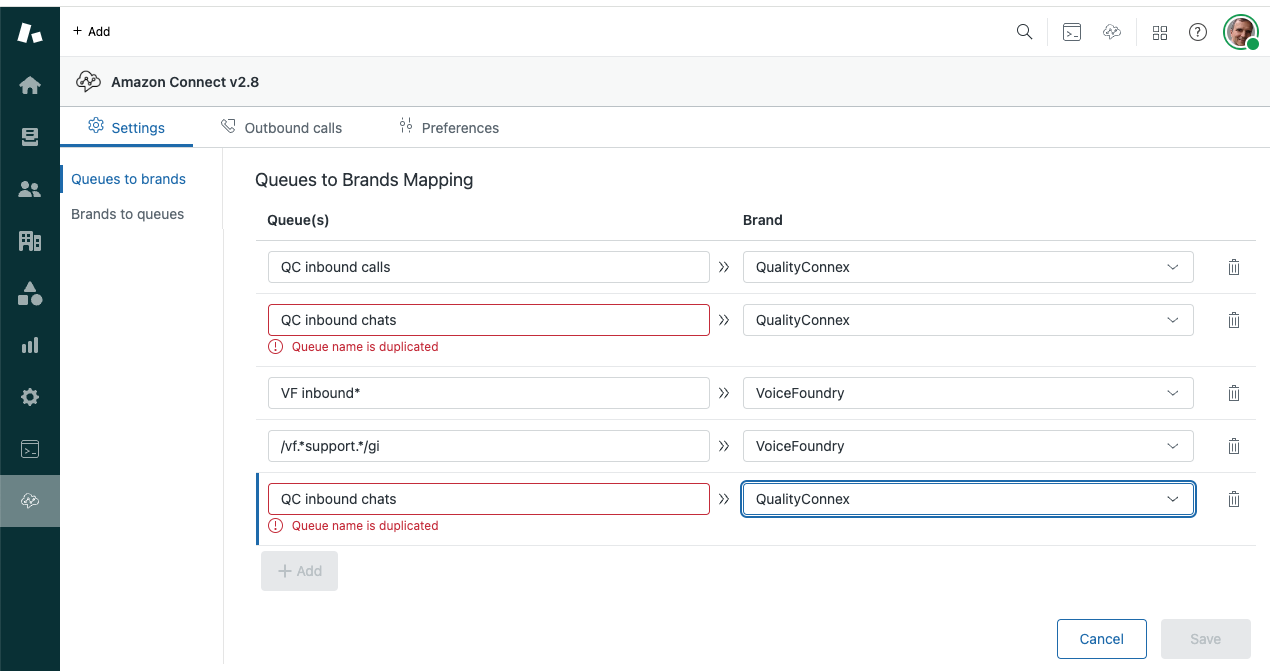
A queue name cannot be longer than 128 characters and duplicate queue names are not allowed. For either of these two cases the app will display an error message and will not allow you to save.
If the queue name of the contact doesn’t match any specified mapping, a brand will not be automatically applied to the ticket by the app, though other Zendesk rules may still apply.
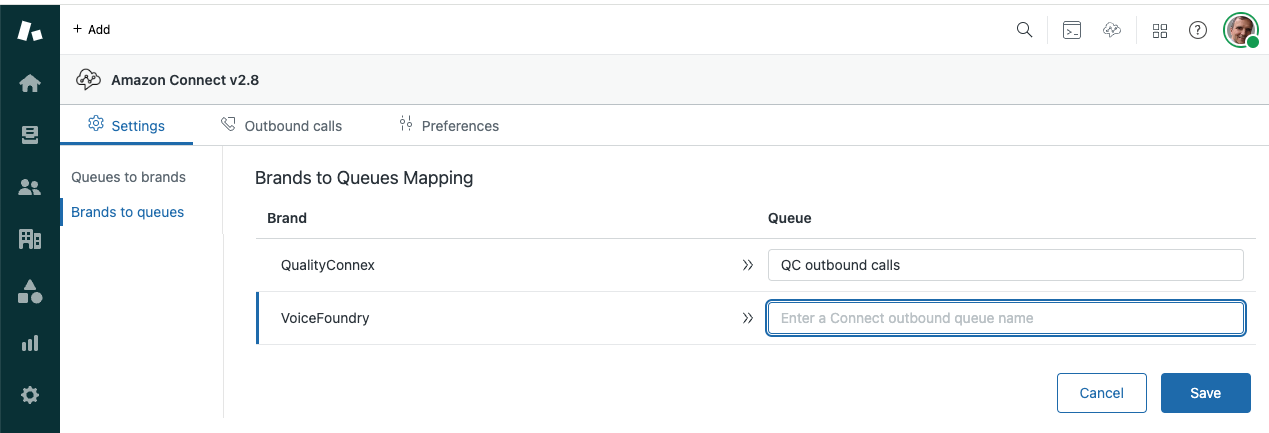
Brands to Queues Mapping
When a brand is mapped to a queue, a click-to-dial from a ticket with that brand will automatically route to that queue, and display the corresponding CLI on the customer’s phone.
Other settings and circumstances may influence actual outbound queue applied - see a detailed explanation in the Outbound Queue Determination Process section below.
To map Zendesk brands to their respective Connect queues select Brands to queues option from the Settings menu. All your active Zendesk brands will be listed on the left and you just need to enter desired matching queue names on the right:
The mapping is one to one, therefore wild cards and regular expressions are not applicable and, if used will cause a warning:

If a valid wild card or regular expression is used, it will be treated as a single queue name.
If a queue name is misspelled or the queue does not exist in the agent’s routing profile, then the default outbound queue will apply when making outbound calls. See the Outbound Queue Determination Process section below.
Setting Outbound Queue via Custom Field
Apart from the brand to queue mapping you can set the outbound queue for a ticket via a custom Zendesk ticket field.
In your contact flow set a contact flow attribute ticket_outbound_queue with a name of the queue to be used in outbound calls from the ticket created by this call.
This feature requires a custom Zendesk ticket field, named connect_outbound_queue which will store a value supplied by the above contact flow attribute.
To create this field, navigate to Objects and rules > Tickets > Fields in your Zendesk admin portal and create a new text field:

When a ticket has a brand assigned as well as the connect_outbound_queue custom field, then any brand to outbound queue mapping will be ignored and the custom field value will be used as the outbound queue name. See the Outbound Queue Determination Process section below.
Manual Outbound Queue Selection
Before making an outbound call the agent has ability to select the outbound queue manually (see User guide):
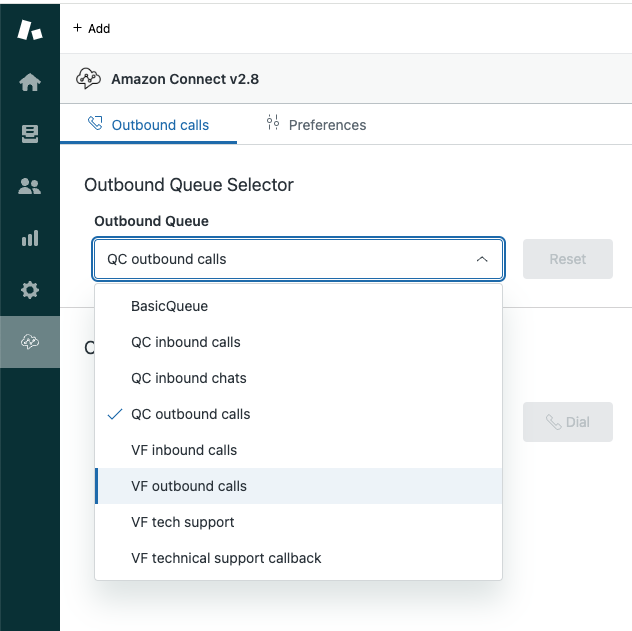
The Outbound Queue dropdown contains all queues from the agent’s routing profile. It is populated after a Zendesk page load (or Reload all apps action) and set to the default outbound queue for that routing profile. Once a custom queue is selected it is kept as a setting for the duration of the agent’s session, or until the next app reload. The Reset button serves as a shortcut to set the selection back to the default outbound queue.
It is important to note that every outbound queue to be used for outbound calls must have an Outbound CLI set or the connection will fail when trying to make a call from that queue.
You also need to ensure that every Phone Number in your Connect instance is mapped to an Inbound Flow so if a customer calls back, they get routed to the correct place.
Outbound Queue Determination Process
When an agent uses click-to-dial feature to make an outbound call from a Zendesk ticket the outbound queue that will apply to that call is determined via the following order of priority:
If the agent has selected a custom outbound queue as described above, this queue will apply and other rules will be ignored.
If the ticket from which the agent is dialling has a
connect_outbound_queuecustom field set, and the specified queue is part of the agent’s routing profile, then that queue will apply.If the ticket has a brand assigned and that brand has been mapped to a queue and the mapped queue is part of the agent’s routing profile, then that queue will apply.
If none of the above applies, then the default outbound queue of the agent’s routing profile will be used.
The above process applies to both, dialling an existing number from the dropdown menu when initiating click-to-call, or using Enter a number option from the same menu.